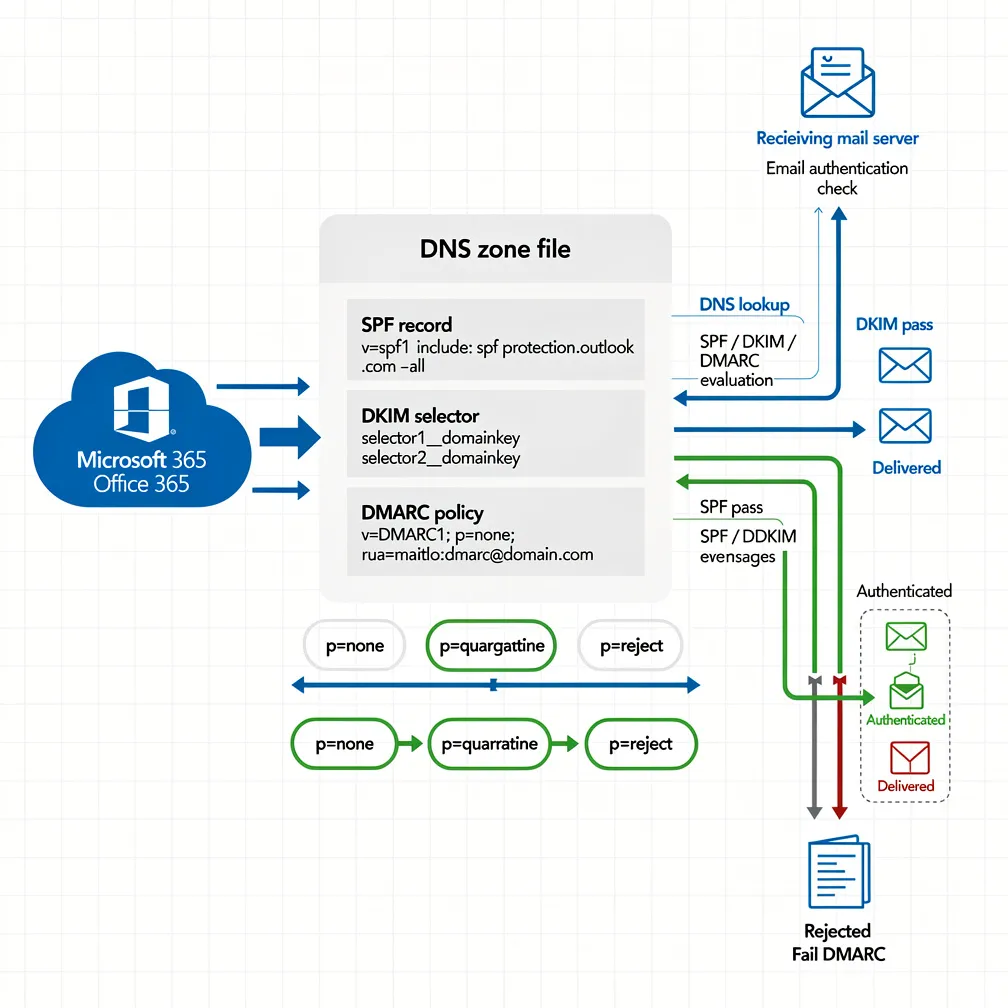
Email spoofing and phishing attacks targeting Office 365 domains have become increasingly sophisticated, making DMARC implementation essential for protecting your organization’s email reputation. As an Office 365 administrator, implementing DMARC correctly ensures your legitimate emails reach recipients while blocking unauthorized senders from impersonating your domain. This comprehensive guide walks you through every step of configuring office 365 dmarc, from prerequisites to testing and monitoring.
Before implementing microsoft 365 dmarc, you must have both SPF and DKIM properly configured. DMARC relies on these authentication methods to validate email legitimacy.
For SPF, your DNS must include Microsoft’s protection servers. Your SPF record should contain include:spf.protection.outlook.com at minimum. If you’re using only the default onmicrosoft.com domain, Microsoft handles this automatically. However, custom domains require manual DNS configuration and verification through the Microsoft 365 admin center.
Verify your custom domain status by navigating to Settings > Domains in the Microsoft 365 admin center. Your domain must show as “Healthy” with all DNS records properly configured before proceeding with DMARC.
For DKIM, Microsoft 365 uses two selector records that must be published as CNAME records in your DNS:
Enable DKIM signing in the Microsoft 365 Defender portal under Email & Collaboration > Policies & Rules > Threat policies > Email Authentication Settings. Both selectors must show as enabled before implementing DMARC.
DMARC records are published as TXT records in DNS at _dmarc.yourdomain.com. Understanding each tag is crucial for proper dmarc office 365 setup.
Essential DMARC tags:
Example progression of DMARC records:
Initial monitoring phase:
v=DMARC1; p=none; rua=mailto:[email protected]; ruf=mailto:[email protected]; pct=100; adkim=r; aspf=r
Quarantine phase:
v=DMARC1; p=quarantine; rua=mailto:[email protected]; pct=10; adkim=r; aspf=r
Full enforcement:
v=DMARC1; p=reject; rua=mailto:[email protected]; pct=100; adkim=r; aspf=r
Never start with a reject policy. The recommended policy progression strategy protects legitimate email flow while gathering intelligence about your email ecosystem.
Phase 1: Monitoring (p=none) – Deploy with p=none for at least 2-4 weeks. This generates reports without affecting email delivery. Monitor aggregate reports to identify all legitimate sending sources, including third-party services, marketing platforms, and internal applications.
Phase 2: Quarantine with gradual rollout – After validating all legitimate sources pass DMARC, move to p=quarantine with pct=10. This applies the quarantine policy to only 10% of failing messages. Monitor for one week, then increase to pct=25, then pct=50, then pct=100 over several weeks.
Phase 3: Reject policy – Once confident in your configuration, implement p=reject following the same percentage ramp-up strategy. Start with pct=10 and gradually increase to pct=100.
This gradual approach minimizes the risk of blocking legitimate emails while providing multiple checkpoints to identify and resolve authentication issues.
Microsoft 365’s email infrastructure has unique characteristics that affect DMARC implementation.
The default SPF record include:spf.protection.outlook.com covers Exchange Online Protection (EOP) servers. However, if you use additional email services or have on-premises Exchange hybrid configurations, your SPF record must include all sending sources. Remember that SPF has a 10 DNS lookup limit.
Exchange Online Protection automatically handles DKIM signing for outbound mail once enabled. The dual selector system (selector1 and selector2) provides redundancy and facilitates key rotation without service interruption.
EOP’s behavior with DMARC affects how your policies are enforced. When receiving mail, EOP performs DMARC checks and adds authentication results to message headers. For outbound mail, proper DKIM signing ensures your messages pass DMARC checks at recipient servers.
Understanding these Microsoft-specific implementations ensures your office 365 dmarc configuration aligns with the platform’s architecture.
Office 365 environments typically involve multiple services sending email on behalf of your domain, creating authentication challenges.
Microsoft shared services:
These Microsoft services generally authenticate properly by default, but verify during your p=none monitoring phase.
Third-party applications sending through Office 365 connectors require careful configuration. Applications using SMTP AUTH or direct send methods must be properly configured in Exchange Online connectors. Review your connector settings and ensure third-party services either:
For detailed comparisons of email authentication solutions, visit our comparison page.
DMARC aggregate reports provide visibility into email authentication results across the internet.
Configure the rua= tag with a dedicated email address: rua=mailto:[email protected]. Create this mailbox in Office 365 and consider applying retention policies, as report volume can be substantial for active domains.
Recommended DMARC report analyzers:
Aggregate reports arrive as XML files from receiving mail servers. These reports show authentication results, message volumes, and source IP addresses. For Office 365-originated mail, look for IP addresses belonging to Microsoft’s infrastructure and verify they show SPF and DKIM pass results.
Key metrics to monitor include DMARC pass rate, SPF alignment rate, DKIM alignment rate, and identification of unauthorized sending sources. Reports help distinguish legitimate traffic from spoofing attempts.
Thorough testing validates your microsoft 365 dmarc implementation before enforcing strict policies.
DNS validation tools:
Real-world testing procedure:
Send test emails from your Office 365 environment to personal Gmail and Yahoo accounts. After receiving the messages, view the original message source and examine the Authentication-Results header. Look for:
Test from different services within your organization (Outlook desktop, Outlook web, Teams, SharePoint) to ensure comprehensive authentication coverage.
Validate alignment by confirming the From domain matches either the SPF-authenticated domain or DKIM signature domain. Relaxed alignment (adkim=r; aspf=r) allows organizational domain matching, while strict alignment requires exact domain matches.
Implementing office 365 dmarc protection is essential for maintaining email security and deliverability in today’s threat landscape. By following this step-by-step approach—establishing SPF and DKIM prerequisites, creating properly structured DMARC records, progressing through monitoring to enforcement policies, addressing Office 365-specific considerations, managing shared services, analyzing reports, and thoroughly testing—you create robust email authentication that protects your organization from spoofing while ensuring legitimate messages reach their destinations. Start with p=none today, monitor your reports, and gradually progress to full enforcement for comprehensive email security.