What is DKIM Email Authentication?
DKIM (DomainKeys Identified Mail) is a critical email authentication protocol that allows receiving mail servers to verify that an email message was actually sent by the domain it claims to be from and that the message content hasn’t been altered during transit. As email security threats continue to evolve, DKIM has become an essential component of any organization’s email infrastructure, working alongside SPF and DMARC to protect against phishing, spoofing, and email fraud.
For email administrators and IT professionals, implementing DKIM email authentication is no longer optional—it’s a fundamental requirement for maintaining email deliverability and protecting your domain reputation. Major email providers like Gmail, Outlook, and Yahoo now heavily weight DKIM authentication in their spam filtering algorithms, meaning proper DKIM configuration directly impacts whether your legitimate emails reach the inbox or land in spam folders.
How DKIM Signatures Work: The Technical Foundation
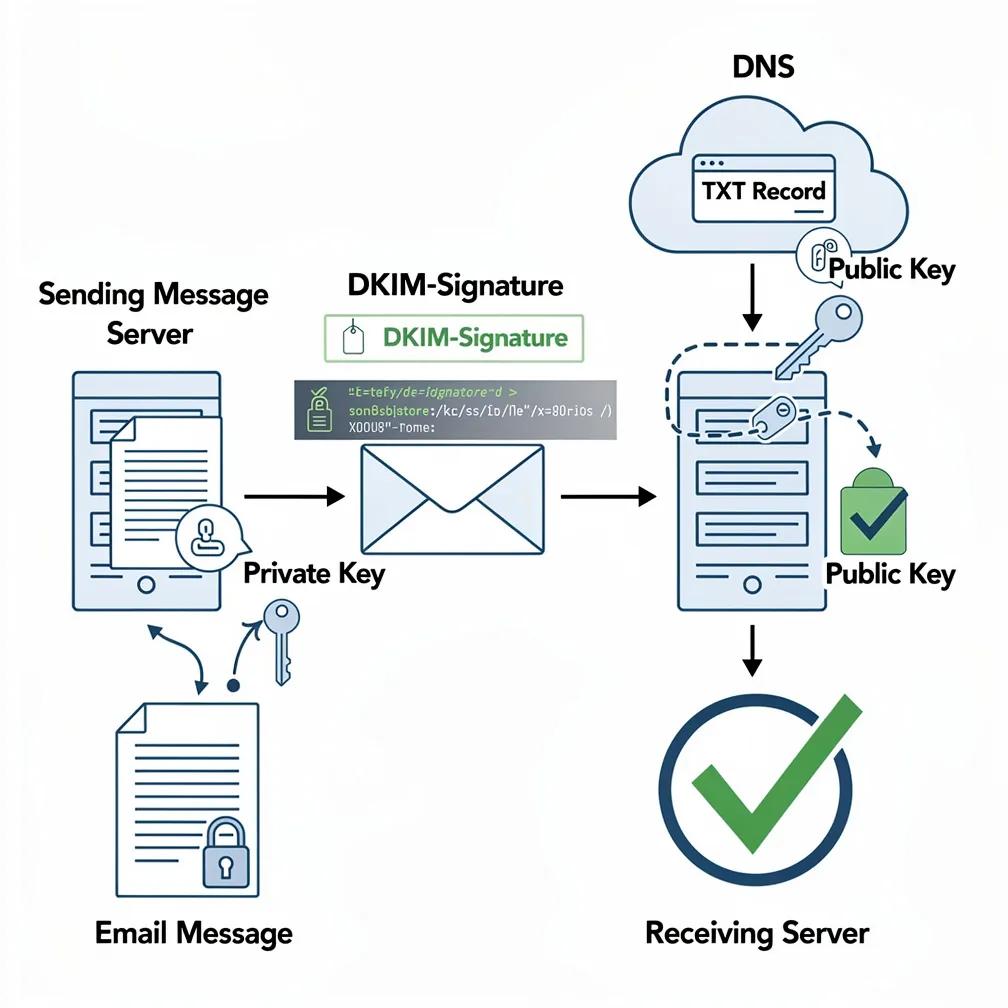
DKIM operates on asymmetric cryptography principles, using a private-public key pair to create and verify digital signatures. Understanding this process is crucial for proper implementation and troubleshooting.
The DKIM Signature Creation Process
When your mail server sends an email with DKIM enabled, it performs the following steps:
- Hash Generation: The sending server creates a cryptographic hash of specific email headers and the message body using a hashing algorithm (typically SHA-256).
- Signature Creation: The hash is encrypted using your domain’s private DKIM key, creating a digital signature.
- Header Injection: The signature is added to the email as a DKIM-Signature header containing the signature data, selector information, and signing domain.
- Transmission: The email is sent with the DKIM signature attached.
The DKIM Verification Process
When a receiving mail server gets an email claiming to be from your domain, it validates the DKIM signature through these steps:
- DNS Lookup: The receiving server extracts the selector and domain from the DKIM-Signature header and performs a DNS TXT record lookup to retrieve your public DKIM key.
- Hash Reconstruction: The receiving server generates its own hash of the specified headers and body using the same algorithm indicated in the signature.
- Signature Decryption: The DKIM signature is decrypted using your public key from DNS.
- Comparison: If the decrypted signature matches the locally generated hash, the DKIM check passes, verifying both authenticity and message integrity.
The beauty of this system is that the private key never leaves your mail server, while the public key can be safely published in DNS for any receiving server to access.
DKIM vs SPF: Understanding the Difference
Both DKIM and SPF are email authentication protocols, but they serve different purposes and protect against different attack vectors. Understanding these differences helps you implement a comprehensive email security strategy.
SPF (Sender Policy Framework)
SPF verifies that email is sent from an authorized IP address for your domain. It’s simpler to implement but has significant limitations:
- IP-based authentication: SPF only checks the sending server’s IP address against your published SPF record
- Forwarding problem: SPF breaks when email is forwarded because the forwarding server’s IP isn’t in your SPF record
- No content validation: SPF doesn’t verify that message content hasn’t been modified
- Envelope vs header: SPF authenticates the envelope sender (MAIL FROM), not the visible From header users see
DKIM Advantages
DKIM provides more robust authentication through cryptographic signatures:
- Content integrity: DKIM validates that the message body and signed headers haven’t been altered
- Survives forwarding: DKIM signatures remain valid even when email is forwarded through intermediate servers
- Domain reputation: DKIM ties authentication directly to your domain, building sender reputation over time
- Granular control: Multiple DKIM selectors allow different keys for different mail streams
The Complete Picture
Neither DKIM nor SPF alone provides complete protection. Best practice is implementing both, along with DMARC (Domain-based Message Authentication, Reporting, and Conformance) to create a comprehensive email authentication framework. SPF provides fast IP-based validation, DKIM ensures message integrity and survives forwarding, and DMARC ties them together with policy enforcement and reporting.
DKIM Setup: Step-by-Step Implementation Guide
Implementing DKIM requires coordination between your mail server configuration and DNS settings. Follow this systematic approach for reliable deployment.
Step 1: Generate Your DKIM Keys
The first step in DKIM implementation is generating a cryptographic key pair. The security and length of these keys are critical.
Key Length Recommendations:
- 2048-bit keys: Current industry standard, provides strong security for the foreseeable future
- 1024-bit keys: Minimum acceptable length, but increasingly deprecated by major receivers
- 4096-bit keys: Maximum security but may cause DNS record length issues
Most modern mail servers and email services include built-in DKIM key generation tools. For Linux mail servers using OpenDKIM, generate keys with:
opendkim-genkey -b 2048 -d yourdomain.com -D /etc/opendkim/keys -s default -v
This command creates two files: default.private (your private key) and default.txt (containing the public key for DNS publication).
Step 2: Choose Your DKIM Selector
A DKIM selector is a string that allows you to have multiple DKIM keys for the same domain. This provides flexibility for key rotation, separating different mail streams, or using different keys for different services.
Common selector naming strategies:
- Generic: “default”, “mail”, “dkim”
- Date-based: “may2026”, “2026q2” (useful for tracking when keys were created)
- Service-based: “marketing”, “transactional”, “support” (separate keys for different mail types)
The selector becomes part of your DNS record hostname: selector._domainkey.yourdomain.com
Step 3: Configure Your Mail Server
Mail server configuration varies by platform, but the core requirements remain consistent:
For Postfix with OpenDKIM:
- Place your private key in
/etc/opendkim/keys/yourdomain.com/default.private
- Set restrictive permissions:
chmod 600 default.private
- Update
/etc/opendkim.conf with your domain and key location
- Configure Postfix to connect to OpenDKIM via socket or inet
- Restart both services:
systemctl restart opendkim postfix
For Microsoft Exchange Server:
- Use Exchange Admin Center or PowerShell to enable DKIM signing
- Exchange will generate keys automatically for your accepted domains
- Copy the generated CNAME records to your DNS provider
- Enable DKIM signing in Exchange after DNS propagation
For Cloud Email Services (Google Workspace, Microsoft 365):
- Access the admin console for your email service
- Navigate to the DKIM configuration section
- Generate DKIM keys within the service interface
- Copy the provided DNS TXT or CNAME records
- Enable DKIM signing after DNS verification
Step 4: Publish Your DKIM Record in DNS
Publishing your DKIM record in DNS makes your public key available for receiving servers to validate signatures. This is a critical step that requires precision.
DKIM DNS Record Structure:
selector._domainkey.yourdomain.com. IN TXT "v=DKIM1; k=rsa; p=MIIBIjANBgkqhkiG9w0BAQEFAAOCAQ8AMIIBCgKCAQEA..."
Key components explained:
- v=DKIM1: Version identifier (always DKIM1)
- k=rsa: Key type (RSA is standard)
- p=…: Your public key (base64-encoded, very long string)
- Optional tags: t=s (strict mode), t=y (testing mode), n=notes
DNS Provider Configuration:
- Log into your DNS management console
- Create a new TXT record
- Set hostname to
selector._domainkey (some providers require the full FQDN)
- Paste the entire public key string as the value
- Set TTL to 3600 seconds initially
- Save and publish the record
Important DNS considerations:
- Remove any line breaks or spaces from the public key string
- Some DNS providers require the TXT value to be enclosed in quotes
- If your key is too long (>255 characters in a single string), you may need to split it into multiple quoted strings concatenated together
- DNS propagation can take up to 48 hours, though typically completes within 1-4 hours
Step 5: Verify Your DKIM Configuration
Before relying on DKIM in production, thorough testing ensures proper implementation.
DNS Verification:
dig default._domainkey.yourdomain.com TXT +short
This should return your complete DKIM public key. If it returns nothing, DNS propagation isn’t complete or the record is misconfigured.
End-to-End Testing:
- Send a test email from your domain to a Gmail account you control
- Open the email in Gmail and click “Show original”
- Look for “DKIM: ‘PASS'” in the authentication results
- Check that the signing domain matches your domain
Online DKIM validators like MXToolbox, DKIMValidator.com, or Mail-Tester.com provide detailed analysis of your DKIM configuration and can identify subtle issues.
DKIM Troubleshooting: Common Issues and Solutions
Even with careful implementation, DKIM issues can arise. Understanding common failure modes accelerates resolution.
DKIM Signature Not Found
Symptoms: Receiving servers report “DKIM: none” or “no DKIM signature present”
Causes and solutions:
- Mail server not signing: Verify that DKIM signing is enabled in your mail server configuration and the service is running
- Wrong domain: Ensure the mail server is configured to sign for the correct sending domain
- Permissions issue: Check that the mail server process has read access to the private key file
- Path incorrect: Verify the key file path in your mail server configuration matches the actual file location
DKIM Signature Verification Failed
Symptoms: Authentication results show “DKIM: fail” or “DKIM: permerror”
Causes and solutions:
- DNS record missing or wrong: Use
dig to verify your DKIM DNS record is published correctly
- Selector mismatch: The selector in your mail server config must match the DNS record hostname
- Key mismatch: Ensure the public key in DNS corresponds to the private key your server is using for signing
- Syntax error: Check for extra spaces, line breaks, or special characters in your DNS record
- Body modification: Some mail gateways or mailing list software modify message content, breaking signatures
DKIM Temporary Failures (temperror)
Symptoms: Intermittent DKIM failures with “temperror” status
Causes and solutions:
- DNS timeout: Receiving servers couldn’t query your DNS in time; improve DNS reliability and response times
- Rate limiting: Your DNS provider may be rate-limiting queries; consider a more robust DNS service
- Network issues: Transient network problems between receiving server and your DNS
DKIM Signature Body Hash Did Not Verify
Symptoms: “body hash did not verify” in authentication results
Causes and solutions:
- Content modification: Antivirus software, disclaimers, or mail filters are modifying the message after signing
- Line ending issues: Inconsistent line ending handling (CRLF vs LF) can cause hash mismatches
- Canonicalization: Try changing the canonicalization algorithm in your DKIM config (simple vs relaxed)
DKIM Key Too Small or Weak
Symptoms: Major providers reject or downgrade trust in your DKIM signatures
Solution: Gmail and other major receivers now require 2048-bit minimum key length. Generate new keys with at least 2048 bits and update your configuration.
DKIM Best Practices for Email Administrators
Following these best practices ensures robust, maintainable DKIM implementation:
Security Best Practices
- Key rotation: Rotate DKIM keys annually or when personnel with key access leave; use selectors to enable zero-downtime rotation
- Private key protection: Store private keys with restrictive permissions (600) and limit access to mail server processes only
- Multiple selectors: Maintain overlapping keys during rotation periods to prevent signature failures during DNS propagation
- Testing mode: Use
t=y tag in DNS when initially deploying to monitor without affecting deliverability
Operational Best Practices
- Monitor DKIM status: Implement automated checks to alert on DKIM signing failures or DNS issues
- Sign all mail streams: Ensure transactional emails, marketing campaigns, and automated messages are all DKIM-signed
- DMARC alignment: Configure DKIM to align with your DMARC policy (d= domain should match From header domain)
- Header selection: Sign important headers like From, To, Subject, Date, and Message-ID to prevent manipulation
- Documentation: Document your DKIM selectors, key locations, rotation schedule, and configuration details
Deliverability Optimization
- Consistency: Use the same DKIM selector and domain for all mail to build consistent reputation
- Volume ramping: When changing DKIM keys, gradually increase sending volume to establish new key reputation
- Feedback loops: Subscribe to feedback loops from major ISPs to monitor complaint rates on DKIM-signed mail
- DMARC reports: Analyze DMARC aggregate reports to identify DKIM authentication failures across receivers
DKIM in the Modern Email Security Ecosystem
DKIM is one pillar of the email authentication triad alongside SPF and DMARC. As cyber threats evolve, properly configured DKIM email authentication becomes increasingly critical for protecting your organization’s email infrastructure and maintaining trust with email recipients.
Major email providers now require DKIM for bulk senders, and its absence significantly impacts deliverability. For email administrators and IT professionals, mastering DKIM configuration, troubleshooting, and maintenance is an essential skill.
By following this comprehensive guide, you’ve gained the technical knowledge to implement robust DKIM authentication, troubleshoot common issues, and maintain a secure, deliverable email infrastructure that protects both your organization and your recipients from email-based threats.