Email authentication is no longer optional in today’s threat landscape. With phishing attacks and domain spoofing on the rise, implementing DMARC (Domain-based Message Authentication, Reporting and Conformance) has become essential for protecting your organization’s email reputation and ensuring legitimate messages reach their intended recipients. This comprehensive guide will walk you through everything you need to know about creating and publishing a DMARC record for your domain.
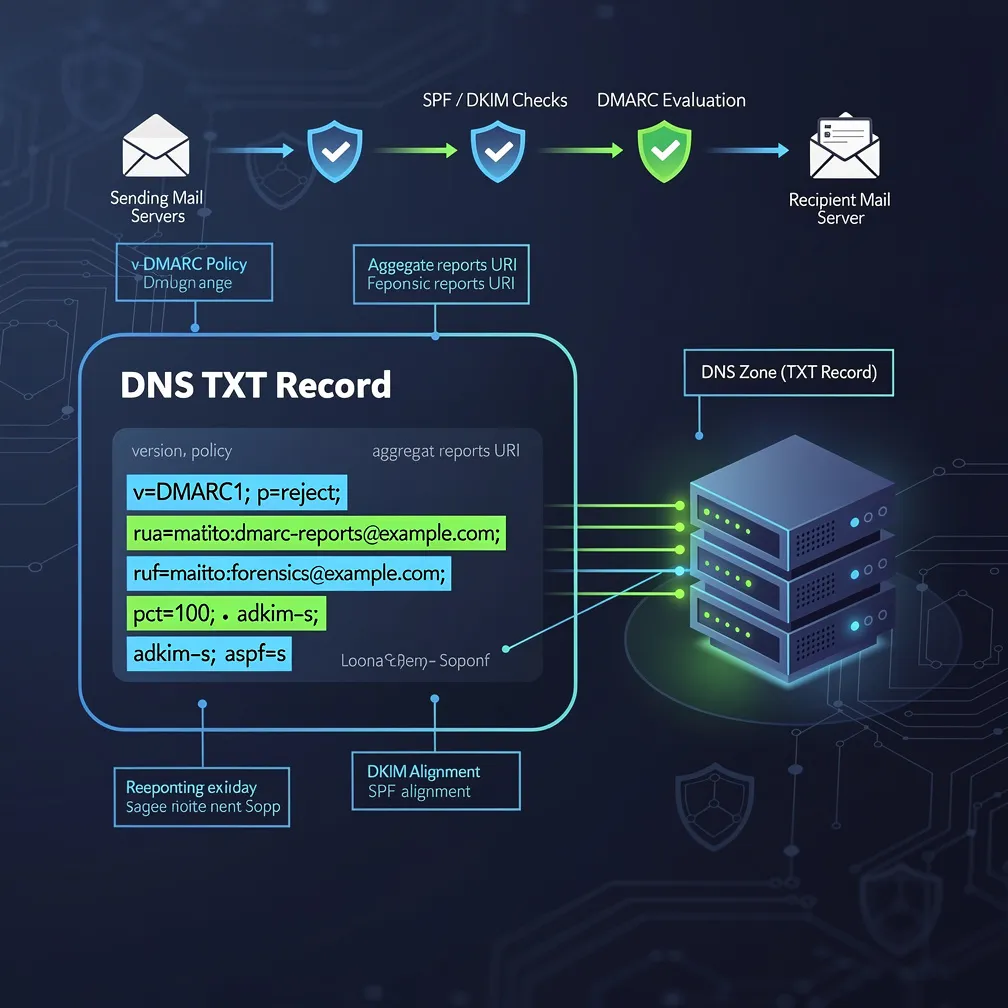
A DMARC record is a DNS TXT record that instructs receiving mail servers how to handle email messages that fail SPF (Sender Policy Framework) or DKIM (DomainKeys Identified Mail) authentication checks. Essentially, it’s your domain’s published policy that tells the world what to do with emails claiming to be from your domain but failing authentication.
DMARC stands for Domain-based Message Authentication, Reporting and Conformance. It builds upon existing SPF and DKIM protocols by adding a critical reporting mechanism and allowing domain owners to specify explicit handling instructions. When properly configured, a DMARC record helps prevent unauthorized parties from sending emails that appear to come from your domain, significantly reducing the risk of phishing attacks that target your customers, partners, or employees.
The DMARC record also provides valuable visibility into your email ecosystem through aggregate and forensic reports, helping you identify legitimate sending sources and potential threats.
A DMARC DNS record follows a specific syntax structure consisting of tag-value pairs separated by semicolons. The basic structure looks like this:
v=DMARC1; p=policy; rua=mailto:[email protected]; ruf=mailto:[email protected]; pct=100; sp=policy
Each component serves a specific purpose in defining how receiving servers should process your email and report back to you. The record must always begin with the version tag (v=DMARC1), and the policy tag (p) is required. All other tags are optional but highly recommended for comprehensive email authentication management.
The order of tags doesn’t matter, but maintaining a consistent format improves readability when you or other administrators need to review or modify the record later.
Understanding each DMARC tag is crucial for building an effective policy. Here’s a comprehensive breakdown of all major tags:
DMARC offers three distinct policy levels, each providing different levels of protection and impact on email delivery:
None (Monitoring Only): The “none” policy instructs receiving servers to take no action on messages that fail authentication but still send reports back to you. This is purely a monitoring mode that allows you to gain visibility into your email streams without risking legitimate email delivery. It’s the recommended starting point for any DMARC implementation.
Quarantine (Send to Spam): The “quarantine” policy tells receiving servers to treat failed messages as suspicious, typically routing them to the spam or junk folder rather than the inbox. This provides protection while still allowing recipients to recover legitimate messages that may have been incorrectly flagged.
Reject (Block Entirely): The “reject” policy is the strictest level, instructing receiving servers to completely block messages that fail DMARC authentication. These messages are typically bounced back and never reach the recipient’s mailbox. This provides maximum protection but requires absolute confidence in your email authentication configuration.
At Email Delivery Pro, we strongly recommend starting with a “none” policy to monitor your email ecosystem for at least 2-4 weeks. Analyze the reports to identify all legitimate sending sources, ensure they’re properly authenticated with SPF and DKIM, then gradually progress to “quarantine” and eventually “reject” as confidence in your configuration grows.
Here are three practical DMARC record examples demonstrating different implementation stages:
Basic Monitoring-Only Record:
v=DMARC1; p=none; rua=mailto:[email protected]
This basic DMARC record example sets a monitoring policy with aggregate reporting. It’s ideal for initial deployment when you want visibility without affecting mail flow.
Intermediate Quarantine Record:
v=DMARC1; p=quarantine; pct=50; rua=mailto:[email protected]; ruf=mailto:[email protected]; fo=1
This intermediate configuration applies quarantine policy to 50% of failing messages while collecting both aggregate and forensic reports. The gradual rollout minimizes risk during the transition period.
Strict Reject Record:
v=DMARC1; p=reject; sp=reject; pct=100; rua=mailto:[email protected]; adkim=s; aspf=s
This strict DMARC record example implements full rejection of unauthenticated messages for both the domain and subdomains, with strict alignment requirements. This represents the gold standard for DMARC protection.
Follow these steps to implement DMARC for your domain:
1. Determine Your Policy: Decide which policy level to start with. For first-time implementation, always choose “none” to avoid disrupting legitimate email while you gather data.
2. Construct Your DMARC Record: Build your DMARC record string using the syntax and tags explained above. At minimum, include the version (v=DMARC1), policy (p=none), and reporting address (rua=mailto:[email protected]).
3. Log Into Your DNS Provider: Access your DNS management console. This might be your domain registrar, hosting provider, or a dedicated DNS service like Cloudflare, Route 53, or Azure DNS.
4. Create a New TXT Record: Navigate to the DNS record management section and create a new TXT record. The hostname must be exactly “_dmarc.yourdomain.com” (replace yourdomain.com with your actual domain).
5. Paste the DMARC Record Value: In the record value or content field, paste your complete DMARC record string. Do not include the hostname in the value field – only the tag-value pairs starting with “v=DMARC1”.
6. Save and Wait for Propagation: Save the DNS record and allow time for propagation. DNS changes typically propagate within minutes to a few hours, though full global propagation can take up to 48 hours.
7. Verify with a DMARC Lookup Tool: Use a DMARC record checker tool to verify your record is published correctly and properly formatted. Many free tools are available online that will query your DNS and validate the syntax.
Implementing a DMARC record is a critical step in securing your domain’s email reputation and protecting recipients from spoofing attacks. By following this guide, you’ve learned how to construct, publish, and verify a DMARC DNS record that meets your organization’s security requirements.
Remember that DMARC implementation is a journey, not a one-time task. Start with a monitoring policy, diligently review the aggregate reports you receive, ensure all legitimate sending sources are properly authenticated with SPF and DKIM, and gradually tighten your policy from “none” to “quarantine” and finally to “reject.” This measured approach ensures maximum protection while maintaining reliable email delivery for your organization.
At Email Delivery Pro, we’ve seen organizations dramatically reduce phishing attempts and improve email deliverability by properly implementing DMARC. Take the time to do it right, and your domain’s email security will be significantly strengthened.