Email authentication stands as the first line of defense against spoofing and phishing attacks targeting your Office 365 environment. Without proper SPF (Sender Policy Framework) configuration, your organization faces significant risks: legitimate emails may land in spam folders, malicious actors can impersonate your domain, and your email deliverability rates will suffer. For Office 365 administrators, understanding and implementing correct SPF records isn’t optional—it’s essential for maintaining email security and ensuring your messages reach their intended recipients.
When you fail to configure an office 365 spf record, receiving mail servers have no way to verify that emails claiming to originate from your domain are legitimate. This results in increased bounce rates, damaged sender reputation, and potential security breaches that could compromise your entire organization.
Microsoft has specific requirements for SPF implementation within Office 365 and Microsoft 365 environments. Understanding these requirements ensures your configuration aligns with Microsoft’s email infrastructure and authentication protocols.
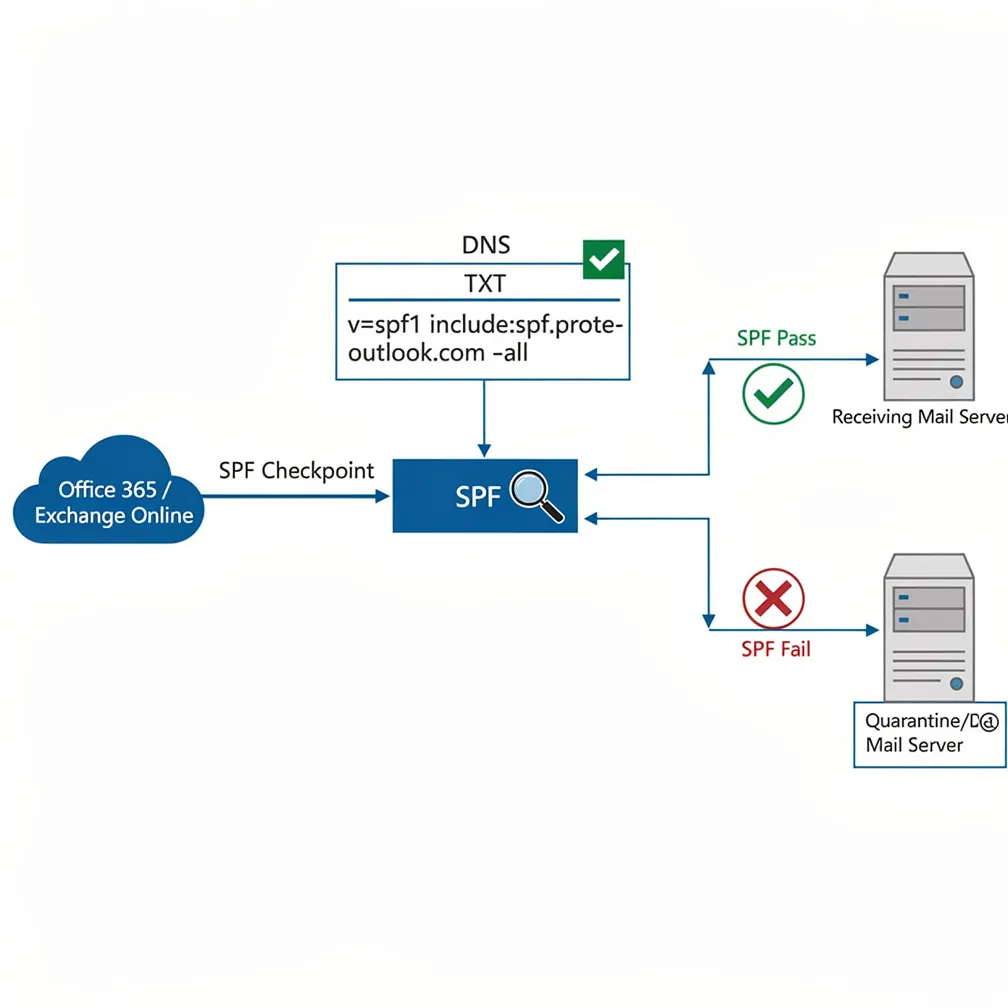
The core requirement for any microsoft 365 spf configuration is including Microsoft’s SPF mechanism in your DNS record. Microsoft requires the following include statement:
include:spf.protection.outlook.com
This mechanism authorizes Microsoft’s mail servers to send email on behalf of your domain. Before implementing your SPF record, you’ll need:
Your SPF record must be published as a TXT record in your domain’s DNS zone. While SPF-type records existed previously, they’re now deprecated, and only TXT records should be used for SPF authentication.
Follow these detailed steps to create and publish your office 365 spf record correctly:
Step 1: Identify Your DNS Provider
Determine where your domain’s DNS records are managed. This might be your domain registrar (GoDaddy, Namecheap, etc.), a dedicated DNS service (Cloudflare, Route53), or your hosting provider.
Step 2: Check for Existing SPF Records
Before creating a new record, verify whether an SPF record already exists. Use command-line tools or your DNS provider’s interface to check for existing TXT records starting with “v=spf1”.
Step 3: Create the Base Office 365 SPF Record
If no SPF record exists, create a new TXT record with this syntax:
v=spf1 include:spf.protection.outlook.com -all
Configure the record with these settings:
Step 4: Publish to DNS
Save the record in your DNS management console. Changes typically propagate within minutes to hours, though full global propagation can take up to 48 hours.
Step 5: Set Appropriate TTL Values
For initial testing, use a lower TTL (300-600 seconds) to allow quick changes if corrections are needed. Once verified, increase to 3600 or higher for better DNS caching performance.
Most organizations use multiple email services beyond Office 365. Marketing platforms, CRM systems, and notification services all require authorization in your SPF record.
To add third-party senders, include additional mechanisms in your SPF record. Here’s an example incorporating SendGrid and Mailchimp:
v=spf1 include:spf.protection.outlook.com include:sendgrid.net include:servers.mcsv.net -all
However, you must remain aware of the 10 DNS lookup limit. Each “include” mechanism counts as a lookup, and exceeding this limit causes SPF validation to fail. If you approach this limit, consider these strategies:
Example using IP addresses instead of includes:
v=spf1 include:spf.protection.outlook.com ip4:192.0.2.0/24 ip6:2001:db8::/32 -all
Understanding each component of your office 365 spf record enables you to troubleshoot issues and customize your configuration appropriately.
v=spf1 – The version identifier. All SPF records must begin with this tag, indicating SPF version 1.
include:domain – Authorizes the SPF record of another domain. For Office 365, include:spf.protection.outlook.com authorizes Microsoft’s mail servers.
ip4:address – Authorizes specific IPv4 addresses or ranges. Example: ip4:203.0.113.0/24
ip6:address – Authorizes specific IPv6 addresses or ranges. Example: ip6:2001:db8::/32
a – Authorizes the A record of your domain. Rarely needed for Office 365 configurations.
mx – Authorizes servers listed in your domain’s MX records. Generally unnecessary when using Office 365.
Qualifiers (-all, ~all, ?all):
Complete example with multiple services:
v=spf1 include:spf.protection.outlook.com include:_spf.salesforce.com ip4:198.51.100.42 -all
Avoid these frequent configuration errors that compromise your microsoft 365 spf implementation:
Multiple SPF Records: Only one SPF record is permitted per domain. Multiple records cause all SPF checks to fail. If you need multiple mechanisms, combine them into a single record.
Exceeding the 10 Lookup Limit: Each include, a, mx, and redirect mechanism counts toward the 10-lookup limit. Exceeding this causes SPF validation failure.
Using +all: This qualifier authorizes any server to send email for your domain, completely defeating SPF’s purpose. Never use +all in production environments.
Incomplete Authorization: Forgetting to include all legitimate sending services results in failed SPF checks for those emails, harming deliverability.
Using ~all Instead of -all: While ~all (soft fail) is useful during testing, production environments should use -all (hard fail) to provide maximum protection against spoofing.
Validation ensures your SPF record functions correctly before it impacts email delivery.
DNS Validation Tools:
Email Header Testing: Send test emails from your Office 365 environment to external accounts you control. Examine the email headers for SPF results. Look for lines containing “spf=pass” or “spf=fail” in the Authentication-Results header.
DMARC Monitoring: Implement DMARC to receive aggregate reports showing SPF authentication results across all your email traffic. For detailed guidance on DMARC implementation, review our DMARC policy configuration technical guide. These reports identify authentication failures and unauthorized sending sources.
Proper SPF configuration is fundamental to Office 365 email security and deliverability. By following this guide, you’ve established the foundation for authenticated email communication that protects your domain from spoofing while ensuring legitimate messages reach their destinations.
At Email Delivery Pro, we understand that email authentication can be complex, especially in environments with multiple sending services. Regular monitoring, testing, and updates to your SPF record ensure continued protection as your email infrastructure evolves. Take the time to validate your configuration today—your email reputation depends on it.